Thursday, October 29, 2009

More than just sewing.

Renting over the last...oh my whole adult life... has taught me that decorating isn't very easy when you can't use nails. Our current landlord hasn't forbidden nails, but made it clear that he prefers if we can avoid them.

We've managed to get some frames to stay up with those 3M wall sticker things, but they don't really work for very heavy frames. We have a large blank wall that needed some sprucing up, but knowing we couldn't put up a large frame posed a problem.

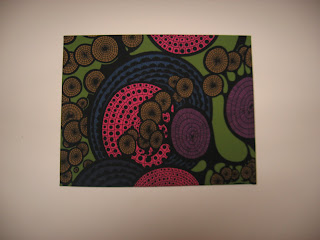
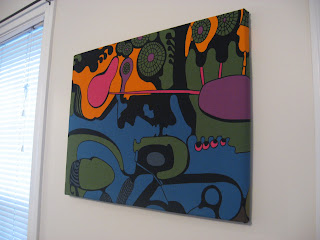
After some Internet searching (there's loads of ideas for renter decorating), hubby and I decided to try a fabric wall hanging. We bought a cheapie canvas from AC Moore that was 50% off and some home dec fabric from Ikea. The fabric from Ikea can be a little pricey, but we didn't need much and we both liked the funkiness of it.


I wish I'd remembered to get more "how to" shots, but we finished these really quickly. We cut the fabric out to be a few inches larger than the canvas, stretched it tight over the canvas, and used a regular old stapler to attach it. No staple gun needed, which is great since I don't have one. I had my hot glue gun ready just in case.


Oooh psychedelic!

We liked it so much, we put another one in the bedroom.

Now I just have to get curtains up in there...and decorate my craft space...and my corkboard and and....it never ends!

Tuesday, October 27, 2009

Lounge Pants & Ruler

Back in September, my good friend Joyce drove me to Walmart to get a few things I needed for the apartment. While we were there, Pi spotted pink flannel with green frogs printed on it and it was instant love. She begged me to buy it for her and make lounge pants (she actually asked for pj pants, but with all the law about flammable/loose material for bed, we'll just call them lounge pants mmmkthx).

I've never made lounge pants before and was honestly petrified of trying. I didn't want to mess up her precious frog flannel since I don't have a car and wouldn't be back to Walmart anytime soon.

Browsing the net, I found THIS tutorial. She makes it look....easy. Looked too good to be true, but I sucked it up and dove in. After minor setbacks (having no pattern paper and resorting to brown grocery bags) and some major setbacks (sewing the entire crotch together, oopsie!), I actually made a pair of pants! The kid loves them and wants me to make her more.


Speaking of my cute kid...

This may look like any old ordinary ruler...


but on the other side, Pi wrote a sweet little note.


It says:

I know my mom
loves crocheting
so I do to. My mom
is a wonderful crocheter.

Awwwwwwwwwwww!

That almost makes up for the time she told her teacher we don't feed her. :)

Sunday, October 25, 2009

Color me spooky.

School treats for Halloween are usually pretty easy to decide on. Some sort of cookie or cupcake decked out for Halloween is always a hit.

This year was a smidge more difficult because one of the kids in Pi's class has severe food allergies. This little girl has to have all of her food specially made, so I didn't want to send in a sweet and have her feel left out.

Looking at the large pile of broken and worn down crayons that Pi has gave me an idea. There were so many, that the container they were kept in barely closed anymore. I figured we could recycle them while making a dent in the crayon overload.

We started by peeling the wrappers, breaking the larger pieces into tiny pieces, and separating them by color families.

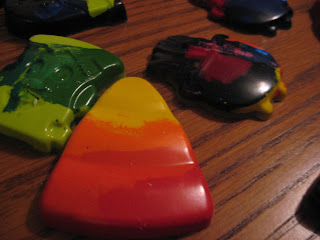
Then we filled up a Halloween cookie mold with them. They were baked at 220 degrees for 10 minutes until fully melted.

When they were done, I let them cool for 5 minutes on the counter and then 5 minutes in the freezer. After the freezer they popped right out.


In no time, we had a stack of super neat crayons and a much more manageable crayon container.

This candy corn and Frankenstein are my two favorites.


They were wrapped up in Halloween lollipop bags and are all ready to go. If I have some extra time this week, I might make little tags to add to the bags.


These favors cost us under $2 (for the bags), just an afternoon worth of time, and no one has to worry about food allergies.
Do you guys send Halloween favors for school? What grade is too old for favors anymore? I'm not sure Pi will let me send anything next year.

Thursday, October 22, 2009

Whipping the WIPS

Organizing my yarn and projects into the new (to me) chest revealed an alarming number of WIPS. Seeing how many half finished projects there were made me realize I've changed.

I expect my relationships with hubby, spawn, my parents, siblings, and friends to morph over time. But I never....never....expected my relationship with yarn to change. I would only work on one or two projects at a time. I would devote equal attention to them and not start anything else until one was done.

Suddenly, there are WIPS staring me in the face, accusing me of startitis and feeling neglected. I barely know myself anymore. *sob*

Ok, enough of the dramatics, haha.

I'm just forgetful. I start something, put it away for whatever reason, and forget about it. Seems like I've done this a lot lately and there are definitely a handful of projects that need some TLC.

Like the big baby I am, I decided to tackle the easy ones first. This is the preemie granny square blanket I started in May. Yeah...MAY! Its only 24"x 24" inches, so I feel like a schmuck that it sat there so long.


The yarn is Joann Rainbow Sensations and the green is Caron pounder. Using a K hook, I should have finished this in a few days or so. It'll be on its way to a NICU sometime this week.


Another lonely WIP was this electric blue scarf. Kinda makes me want to sing the Electric Slide**. Ok, ok I don't want to sing to it, I want to dance to it. Who doesn't love crappy line dances?
Anyway, I started this garter stitch scarf awhile ago. Knitting has been pretty scarce around here lately, so I needed something simple to practice getting my tension right.
I used size 10 needles and Chenille Thick & Quick, which makes it a fairly quick knit if you work on it consistently. Which I didn't (bet you knew that already), so it took me forever.

Doesn't matter though, because I love it. Its soft, warm and super squishy. Have a closer look. See?
I'm donating this one to a church in mid-town that provides scarves to homeless people. I'm hoping to get a few more done before they need to be delivered in November.
Two WIPS down, 9999999 to go.

**As an aside, a co-worker of mine has never heard of the Electric Slide. How is that even possible?

Tuesday, October 20, 2009

When life gives you carrots...

My mom is a great cook. Lord help you if you go to her house and turn down something to eat if its offered to you. You might not be invited back! I've always thought that Mom's cooking is amazing because she actually likes to cook. She takes pride in everything she makes and I think that makes all the difference.

But for as much as my mom is a great cook, her baking skills are a little... lacking (no offense Mom!). Cookies and cakes in my house were mostly store bought since Mom's time and energy went into cooking meals. Not that us kids minded...we were more than happy with the goodies she brought home.

The one exception to Mom's bad baking is her carrot cake. She makes the most amazing, moist, fabulous, fight-for-the-last-slice carrot cake. No one can explain why this cake defies the bad baking rule. But no one cares, because its that good.

I finally asked Mom for the recipe. Baking is an old friend to me now...how badly could I mess it up?

I started with a bag of carrots and peeled them all. One bag will give you enough carrots for 2 cakes.


Then I grated them. I totally cheated and used my MIL's salad spinner. That thing grates at lightning speed. I didn't even know what a salad spinner was until she let me borrow it.

Mixed it all up and stuck it into the oven, feeling pretty darn proud of myself. Heck, not only was it do-able, it was easy! Why did I wait years to ask for this recipe?
While the cake baked, I made Mom's frosting. Holy heavens...so good!
This is where my story of over-confident baking turns sour. I pulled the cake out of the oven and it didn't quite look right. It was dried out on the top and sides. I didn't think I'd left it in too long, but apparently I had.
The cake cooled for more than 20 minutes before I tried to remove it. I had greased that sucker like crazy and it still stuck to the pan, breaking apart and crumbling all over my cooling rack.
Not wanting to waste all of it, I sliced off the hard parts and threw all of the moist parts into a bowl and mixed the icing in to make cake balls.


This turned out to be the best cake disaster ever! The cake balls were amazingly good after they'd chilled in the fridge for awhile.


But, I'm not one to admit defeat so easily (and I still had enough carrot for another cake), so I searched online for other recipes. Most were very similar to Mom's, but with a few minor differences. I chose to up the oil, lower the salt, add baking powder and substitute some of the white sugar for brown sugar for take two.
This time the cake was perfect. The minor changes and lower temperature (I lowered it 15 degrees) made all the difference.

Hubby was in the mood to decorate.

Yum!


If you want to give it a whirl, here's Mom's recipe with my changes:
Carrot Cake Recipe
Ingredients:
oil - 1 and 1/4 cup
white sugar - 1 cup
brown sugar - 1 cup
eggs - 4
salt - 1/4 teaspoon
cinnamon - 2 teaspoons
baking soda - 2 teaspoons
baking powder - 2 teaspoons
flour - 2 cups
carrots - 3 cups grated
vanilla extract - 2 teaspoons

Step 1: In a large bowl, mix oil, sugar, and eggs.
Step 2: Add salt, cinnamon, baking soda, baking powder, and flour. Mix well.
Step 3: Add grated carrots and vanilla extract. Mix well.
Bake at 335 degrees for 40 minutes (or until golden and a toothpick comes out clean).
While the cake is baking, make the super simple icing and let it chill.
Icing:
cream cheese - 16 ozs
powdered sugar - 1 cup
vanilla extract - 1 teaspoon
Mix all ingredients well and chill.
Enjoy and don't blame me for any expanding waistlines! :)

Sunday, October 18, 2009

Basketweave Placemat Pattern

Moving to this new apartment and actually being able to eat at our dining room table, meant that we needed new placemats. I wanted something that had a little texture but was still fairly simple to make. There wasn't anything that really jumped out at me, so I made up my own simple pattern. Its not been tested, so if anyone finds any errors, please feel free to let me know.


Basketweave Placemat

Yarn: Sugar and Cream Confectionery Yarn (14 oz. for two placemats)
Hook: G (or size to obtain gauge)Finished size: 16" x 12"
Gauge: 4 fpdc and 4 bpdc x 6 rows = 2" x 2"
Skill: Intermediate (I only say intermediate because of the fpdc and bpdc. If you're comfortable with these stitches, this is really simple).

Special stitches:
FPDC = front post double crochet
BPDC = back post double crochet

Note: Ch. 2 at beginning of each row counts as a DC.

Placemat:

Chain 65
Row 1: DC in 3rd ch. from hook and in each ch. across. Turn.

Row 2: Ch. 2. FPDC in next st, *BPDC in next 4 sts, FPDC in next 4sts.* Repeat from * to * until last 2 sts. FPDC in next st. DC inlast st. Turn.

Row 3: Ch. 2. BPDC in next st, *FPDC in next 4 sts, BPDC in next 4sts.* Repeat from * to * until last 2 sts. BPDC in next st, DC inlast st.. Turn.

Row 4: Ch. 2. FPDC in next st, *FPDC in next 4 sts, BPDC in next 4sts.* Repeat from * to * until last 2 sts. FPDC in next st. DC inlast st. Turn.

Row 5: Ch. 2. BPDC in next st. *BPDC in next 4 sts, FPDC in next 4sts.* Repeat from * to * until last 2 sts. BPDC in next st. DC inlast st. Turn.

Repeat Rows 2-5 eight more times. Do not fasten off.

Border:

Row 1: Ch.1, *sc in each st. across, 3 sc in corner* four times. Join to first sc with a sl. st.

Row 2: Repeat row 1.

Fasten off and weave in ends. Enjoy!

Saturday, October 17, 2009

An open letter to my spawn

Dear Piper,

You're as cute as a button. Just sayin'!


Love,
Where-you-got-your-good-looks-from,
Mama

:)~

Thursday, October 15, 2009

Its that time of year.

For scarves!! Dudes, it was COLD today. The temp on my way home today was somewhere in the 40s. I'm not a fan of the heat, but I'm not quite ready for it to be this cold yet. Especially since I have to pay my own heating bill this year. And I just happened to read an article today that said the Northeast is going to have the snowiest, coldest winter in years. Oy vey!

Back to scarves...One of my co-workers loves crochet and she bought a few hat and scarf sets from me last year. This year, she bought a crochet hat from some random store (it had a tag on it), but couldn't find a scarf to match. So she called me up and asked if I could make a scarf to match.

I'm always up for a challenge, so I said sure. I headed off to the Lion Brand Yarn Studio during my lunch break in search of the perfect color. (Have I mentioned that Lion Brand is within walking distance of work? Soooo dangerous!) Even though Lion Brand had a bagillion shades of green, none of them matched the olive green of her hat.

Just when I was about to give up, I saw a skein of Homespun that looked like it might work. When I held the yarn up to the hat, the green was a perfect match. Score! I used nearly 2 full skeins to make this scarf nearly 6 feet long, as per my co-workers request.


Look how it striped. Pretty!


I know most people hate working with Homespun, but I love it. Its a little difficult to see your stitches, but it makes such a warm, squishy scarf. Its the Ifeoma scarflette pattern and a J hook for anyone who wants the specifics.


Oooh and look what my MIL scored at a yard sale. Its huge! Piper can lay in here comfortably.


Do you know how much yarn this thing holds? Oh yeah...LOTS!

Tuesday, October 13, 2009

Pumpkin time!

This idea was posted over at Be Different, Act Normal. There's a link to the pattern PDF for these little guys.

Gotta say, I love any idea that lets you decorate pumpkins way before Halloween and won't rot. Seriously easy, these pumpkins used toothpicks, sticky felt, and some markers.


If you haven't checked out Be Different, Act Normal, you should. There are loads of awesome crafty ideas for the holidays and home in general.

Happy Tuesday peeps!

Saturday, October 10, 2009

There are no words...

Get a load of this bathroom sign at a Thai restaurant close to my job.


Hilarious!

Thursday, October 8, 2009

Wrap it, wrap it real good.

Ok, so misquoting "Whip It" isn't going to win me any cool points, but I am a child of the 80s.

Disaster ensued when I tried coasters, so I chucked those to the side for now. Instead, I picked up the S.E.W Everything Workshop book that I'd bought about a year ago.

The wrap skirt seemed simple enough and I had just enough of an old maroon bedsheet left to try it. I figured, if it got messed up, I'd be guilt free since it wasn't fancy fabric.


Note to self: Iron skirt again before pictures.

Its not perfect or anywhere near perfect, but I'm thrilled that I completed it. I just need to find a shirt that makes me look less frumpy, haha.

I think the mojo is coming back, slowly but surely. Finally!

So, what are your kids/neices/nephews/whoever dressing up as for Halloween. Piper and I have been discussing it for awhile, but she can't make a decision and its driving me nuts!

Tuesday, October 6, 2009

Bakefest

The weather has been chillier this last week and it put me in the mood to bake. Of course, when I did bake, the temps shot back up, but there was no stopping me.

This banana bread recipe (first saw it on Ally's blog) has become a family favorite and is requested on a regular basis around here. Add walnuts and it is soooo good. I normally use one of those disposable aluminum loaf pans to make them. But I realized that this is something we're going to be making on a regular basis, so I treated myself to a regular loaf pan.


Now onto the good stuff. The super duper make you drool good stuff.

When I asked you guys to recommend blogs, you responded with a bunch of great blogs that I'd never heard of. One of them was How to Eat a Cupcake and Oh My Word, it is full of amazing cupcake recipes. A.M.A.Z.I.N.G! There was a small puddle of drool on my keyboard after I'd browsed the site for awhile.

The cookie dough cupcakes and frosting sounded too good to be true and I had to try them. I started off with the easy part...making the mini cookies for the top of the cupcakes.


Then I filled the cupcake liners with batter and plopped frozen cookie dough balls on top. I use the aluminum cupcake liners because I don't own a cupcake pan and the aluminum ones normally hold their shape really well.


I filled the liners a little too much! I was lucky that only a few of them ran over, but the liners expanded, instead of keeping their shape, and they looked more like muffins than cupcakes. Time to get myself a cupcake pan.


All done!


Other than the odd shape, the cupcakes came out drool worthy. I was worried about making frosting from scratch, as I've only done it a handful of times, but I was worried for nothing. It should have been a bit stiffer, but the taste was out of this world. My MIL told me to quit my day job and bake full time, haha.
We're supposed to go grocery shopping this weekend. I need to figure out which is the next cupcake to try.

Sunday, October 4, 2009

A FO, really!

Big hook, big yarn, clear pattern = instant gratification!

This is the Kelechi Slouchy Hat pattern. Very simple pattern that results in a cute hat.


Hubby was clearly impatient with having to
play photographer and didn't wait for me to
actually look his way.


Or back up.


I used a partial ball of Caron pounder that was in my stash and a J hook. The hat was finished in 2 days worth of commutes. It would have been faster, but I fell asleep one way. I'm certain I snored and the person next to me probably won't offer to be my new BFF anytime soon.
Hubby and Pi went to the local farmer's market yesterday morning and scored a whole bunch of pumpkins. They're not actually shiny...just wet.


The little ones are in a large bowl on my dining room table, along with sunflowers that they bought for me too. We're taking our time to decide how the large ones should be decorated.


That leaf wall hanger is actually a table runner that I scored at Kmart for cheap. Because of the way our table and place mats are set up, a table runner just doesn't look right on the table. But it makes one pretty wall hanging for fall.
There's been a lot of baking going on this weekend. Wait til you see!